
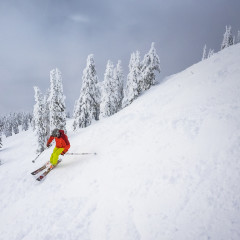
Revelstoke Mountain Resort Skiing
Bottomline: Revelstoke Mountain Resort should be high on your list if you want powder snow and a Ski Resort that caters to the modern powder-hungry skier/snowboarder. The resort boasts the longest vertical in North America (i.e. 1,713 metres/ 5,620 feet) and averages around 9-14 metres of powder snow per season! Getting There: Revelstoke BC is around 200km away from Kelowna International Airport, the resort is a further 6km outside of the town of Revelstoke. There are airport shuttles between Kelowna and Revelstoke, and there are shuttles between the town of Revelstoke and Revelstoke Mountain Resort. I drove directly to Revelstoke Mountain Resort but used the shuttle to the town regularly. Observations: Before I’d ever set foot in Revelstoke I’d heard skiers and snowboarders talk of legends about the snow there. The over-the-head face shots of blower pow, unlike any they’d seen before. This was long before I knew how to ski or knew what any of that meant but I could tell from their goggle-tanned expression of enthusiasm that it must be a good thing. I’ve only personally learned to ski in the past few years so when I read online that Revelstoke Mountain Resort has very little beginner terrain I was a little anxious about what to expect. The difficulty in terrain is generally split like this: 7% Beginner, 45% Intermediate, 48% Advanced. Terrain for all experience levels: But once out in the resort my fears were soon quelled. The intermediate terrain does not feel too difficult and the sheer amount of new snow on the ground will usually make even steeper runs feel forgiving. The actual ski resort at Revelstoke is pretty new, opening for it’s first season at the end of 2007, but it has all the hallmarks of a location that will become the premier ski/snowboard resort of Canada. We stayed at the Sutton Place Hotel in a suite during our visit which was amazing. After a long day of skiing we could ski right back to our Hotel, drop off our skis and head straight for the hot tub to unwind our muscles and get them ready for our next day skiing on the mountain. A view of our Suite The bedroom. Luxury! Our stay was only a few days long so it felt almost like a whistle stop. More fresh snow was in the forecast and it was a hard decision to pack up and move on. The snow was everything we expected and the terrain on the mountain exceeded our expectations. The resort hasn’t been carved into big long wide ski runs that simply go from top to bottom. They curve and narrow and widen and offer...
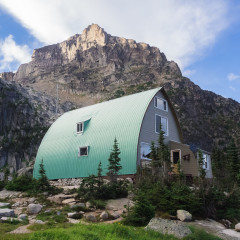
The Conrad Kain Hut in the Bugaboos
Bottom Line: A modern and comfortable cabin in the wild and rugged Bugaboos of the Purcell Mountains. Amenities include running water, stoves, electric lighting, heating and wall outlets. None of those conveniences can compare though with the views of rock spires and rumbling glaciers that surround this Hut. They simply need to be seen to be believed. You will be amazed that you can stay in this place for only CA$25 per night! Observations: The Bugaboos in the Purcell Mountains near Golden, BC have long been famous among Mountaineers as a destination to experience some of the finest alpine climbing available in the world. But a stay at the Conrad Kain Hut needn’t just be a base camp for climbers alone. Indeed, on our visit we rubbed shoulders with trail runners, day hikers, backpackers, photographers and a few families with children. Hopefully the photos included within this article can help to explain why everyone capable of hiking the steep trail from the parking lot should visit this place and consider a stay at the Conrad Kain Hut. Getting There: From Golden, BC drive towards the settlement of Brisco. Follow signs for Bugaboo Provincial Park in Brisco which will take you onto a good gravel road. This winds it’s way towards the Bugaboos parking lot for 45km’s. Once parked look for the chicken wire and logs held in a few corrals in the parking area. Surround the base of your vehicle with this wire and hold it in place with the logs. This is needed to stop porcupines from getting under your vehicle and nibbling on any rubber. The wire and log corrals Our vehicle protected The hike in is exceptionally well maintained, containing ladders, hand rails and concrete steps where they are needed. The trail to the Hut is only 4.6km’s long but rises close to 700m’s in elevation. Take it steady and slow and expect to get to the hut in 2-4 hours, allow for the views on the hike to cause you to linger and stop often. An Oasis in this Rugged Landscape: Once at the cabin we checked in with the friendly Hut Custodian who was expecting us. He gave us a quick tour and let us know where we could sleep, store our food and hang and stash our equipment. The Hut sleeps up to 35 people hostel style and from June to September expect the Hut to be full most weekends, but it will usually be quieter from Monday to Friday. You will be sleeping shoulder to shoulder with the person next to you. This is common for every mountain hut we’ve been to. The First Floor Sleeping The Second Floor...
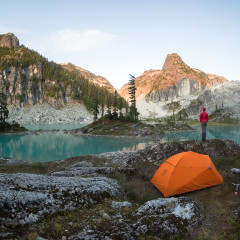
Nemo Kunai 2P Mountaineering Tent Review
Bottom Line: A versatile, innovative and aesthethic tent that is light weight while still holding onto all the features you’d expect in a true 2-person, 4 season tent that will see you through the heat of Summer into the depths of a snowy Winter. First Impressions and Observations: As soon as I held the Nemo Kunai 2P tent in my hands my first thought was: “Yes! A tent that finally comes in a truly usable stuff sack”. I’m not going to lie, the stuff sacks that come with most tents usual disappoint me. Most times they are nothing more than a basic sack with a draw string to close them at the top. Nemo has provided, as standard, with the Kunai 2P tent a stuff sack that is not only waterproof, but allows for airspace to be compressed out and it has a glow in the dark map of popular constellations on the inside! Tent manufacturers take note, this is how you impress a camper before they’ve even had a chance to actually look at the tent. The Kunai 2P tent and pole set Awesome compression stuff sack “Recharge with your headlamp”. Neat! Pitching the Kunai 2P Mountaineering tent is extremely straightforward also. It has two main poles that cross over the main tent body and then an additional brow pole to increase head room at the tent door and provide extra height to the vestibule. The main tent body pitched The front brow pole on the tent Swivel Hub on the Kunai 2P Tent Fully sealed up inside this tent gets warm fast! I can see how the double walled design will make this an amazing tent in Winter. But what about Summer? The venting system to make this a true 4-Season tent, and not just a Winter Tent, is quite remarkable and innovative. Venting on the entrance door Looking down the end of the tent Struts that hold a part of the door open Door vent with strut from the inside Vents have been installed at both ends of the tent, but more than that, struts have been installed into the fly to allow for the vents to be held open, increasing airflow. Awesome! Inside the tent there are pockets where you’d need them. A pocket on each side of the tent down low for a phone or wallet and overhead pockets for a headlamp. If you turn your headlamp on and place it in the overhead pocket it diffuses light around the tent. Side stash pocket Top pocket in the Kunai 2P Tent Space is at a premium inside the tent, but this is understandable as it’s meant as a...
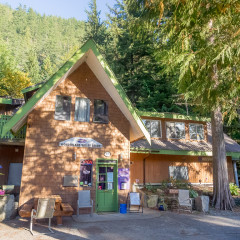
The Wonderland Valley Resort and Campground
Bottom Line: The Wonderland Valley Resort and Campground is a hidden gem for staying overnight in Squamish. Situated in an amazing location in the trees, with moss covered cliffs beside it, a babbling brook running through it and a secret viewpoint to watch sunsets on the impressive Stawamus Chief and beyond. The amenities are generous with fast Wifi (tested at 50Mb/s download during our stay), laundry facilities onsite for washing and drying and clean washrooms. We found the showers always had hot water and the pressure was always high. Loved it! First Impressions: Hidden in the forest just north of Squamish near Brackendale is the Wonderland Valley Resort and Campground. As you leave Squamish heading towards Whistler it is on the right at the intersection of Highway 99 with Depot Road East. This intersection is known locally as “The Yellow House Intersection” due to the large yellow house on the right as you drive north. Turn right here and head along the road into the forest, following the wonderfully designed purple and gold signs for Wonderland. As we entered the grounds for the first time we realized that this was not an RV park like any other we’d seen before. It was colourful, vibrant and charming. We checked in and went about getting our trailer, an old Boler camper, hooked up to power and water. We picked a spot beside a flowing creek for those soothing babbling sounds that would lull us to sleep every night. The trees above rustled with the wind casting speckled sunshine across the forest floor. This place was indeed Wonderland. The Wonderland name originates from this Resorts location next to Alice Lake, referring to the story of “Alice in Wonderland”. Alice Lake can be reached from the grounds on foot or mountain bike by using the “Wonderland” trail. A lot of the trails nearby have been given “Alice in Wonderland” themed names also. Even though we were only a few minutes drive from Squamish we felt like we were out in the wild. Wonderland Valley Resort and Campground has done an excellent job of preserving the natural experience to their grounds. In the evenings be sure to check out the Water Tower Viewpoint that offers amazing views of the sun setting over the Stawamus Chief mountain and the town of Squamish. It will take your breathe away. More than just a Campground: Not only can you camp out in a tent here, they also have service for both 15 amp and 30 amp Campers and RV’s with water, electrical and sewer hook ups as well as a Hotel with views out above the trees into...
Mountain Hardwear SuperMegaUL 2 Tent Review
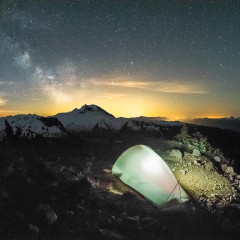
Bottom Line: An Ultralight, 2 person, 3 season tent that’s perfect for those fast and light missions when saving a bit of extra weight is going to make all the difference. First Impressions and Observations: The SuperMegaUL 2 is a beautiful tent, sexy even! It’s light (minimum weight: 2lb 2oz), sets up easily and accommodates two individuals on mummy sleeping pads with room in the vestibule for packs and boots. To make this tent as light as it is the designers at Mountain Hardwear have clearly gone over every feature in this tent and shaved grams wherever possibly. It’s this precise attention to detail that gives this tent its beauty. The space inside is at a minimum, but this was expected with an ultralight tent. I’ve slept in it with another person and had no issues. I’m used to sleeping in small Winter tents so I am accustomed to tents with an interior space of this size. Some might say it’s cramped, I’d say it’s cozy. If you want more space then be prepared for your back and shoulders to have to haul more weight uphill. Those are the tradeoffs. Some of the features that I appreciated are: The toggles on the fly attachment points: They make connecting the fly to the tent body extremely easy and the design is so simple, light and functional that I don’t know why every tent doesn’t use this method. The pole design: This tent utilizes a pole design that I hadn’t seen before. It allows the tent to be freestanding while also simplifying setup and reducing pitching time. It has two main poles that are permanently joined together via a soft rubber joint that is positioned at the apex of the tent. Reflective points on the tent: The tent utilizes quite a few reflective points so that you can spot it easily with your headlamp and also avoid tripping over the guy lines around the tent. Pros: Weight: If you aren’t familiar with Ultralight tents then picking this one up will shock you. At 2 lb. 2 oz. (0.98 kg) this is the lightest tent I’ve ever owned. My back is going to thank me! Design: It’s incredibly well designed. You can tell that every inch of this tent has been discussed and altered to have only the essential features included. I also find the aerodynamic profile of this tent appealing to the eye. Vestibule: Not only does the vestibule aid in ventilation it adds extra space outside for storing my pack and boots. Cons: Durability: The materials used in this tent are ultralight which means they need to be managed more than heavier,...


